Inventory and Price Management
Purpose:
This section explains how to manage and view inventory and price information.
⏱ Estimated time: ~ 20 mins
1. Where to set
- Setting page: Property Management Screen
- Action: 'Inventory - price'
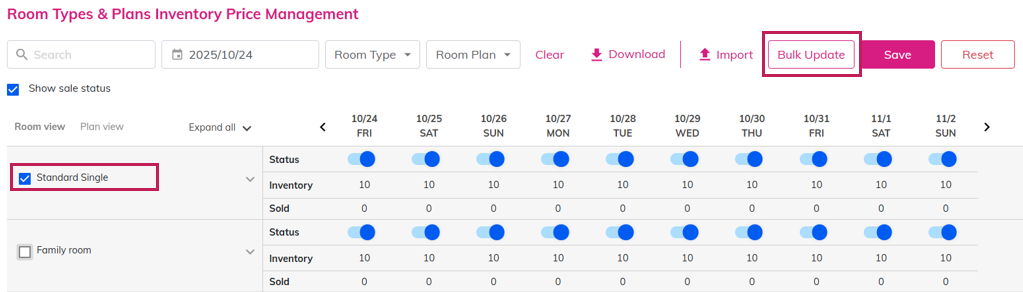
2. Room Types & Plans Inventory Price Management
2.1 Control Panel (Top Section)

| 1. Search Bar | To search information by room or plan name. |
| 2. Calendar | To search by date (up to 10 years ahead). |
3. Room Type
& Room Plan | To display registered room and plan. |
| 4. Clear | To remove all the search filter applied. |
| 5. Download | Registered room rates can be downloaded and reviewed for up to three months in advance.
1. Click the [Download] button. 2. Select the [Data category], [Start date], [Data range].
・[Data category]: Fixed as "Room Rates". ・[Start date]: Enter the starting date for data extraction. ・ [Data range]: Specify the duration for retrieving rate data (maximum: 3 months).
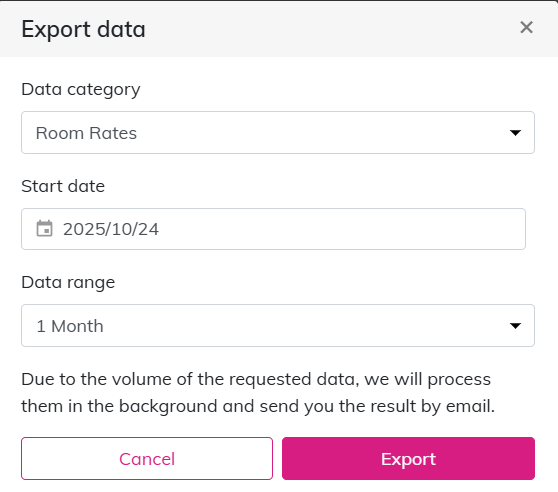
3. Click [Export].
4. After exporting, an email will be sent to the email address used for logging, as shown below.
5. Click the link in the email to download the data file. The downloaded file will open in Excel format, displaying detailed rate information. |
| 6. Import Data | 1. Edit the "downloaded file" to prepare the data. 2. Click [Import] to open the pop-up window and "Select file".
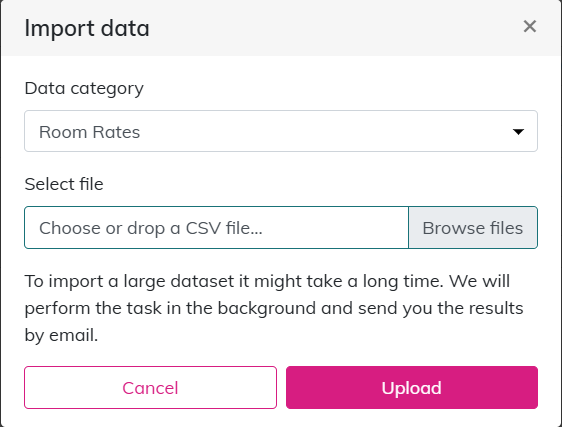
3. Click [Upload] to import the data.
4. After uploading, an email will be sent to the email address used for login, as shown below.
Check the link in the email to confirm that the upload result.
|
Notes When Editing Downloaded Data
Please keep the downloaded file format unchanged, and add the required information as shown in the table below.
| Column | Detail | Input Details |
| A–I | Plan Details | No changes required |
| J | Sales Status | Enter "open" or "closed" |
K
| Pattern ID | No input required |
| L | Rank | No input required |
| M onward | Adult 1 | Enter the rate per number of guests |
*BOM-format files are also supported.
2.2 Room & Plan Overview (Main Table Section)
| 1. Show sale status | To display the availability status of the room. |
| 2. Room View | To display the inventory and sales status of each plan for every room. |
| 3. Plan View | To display the inventory and sales status of each room for every plan. |
| 4. Dropdown Icon | To display the price of the selected room. |
|
3.1 Bulk Update Inventory
| Step 1 | ・Check the "target room" type.
・Click [Bulk Update], pop-up window will display.
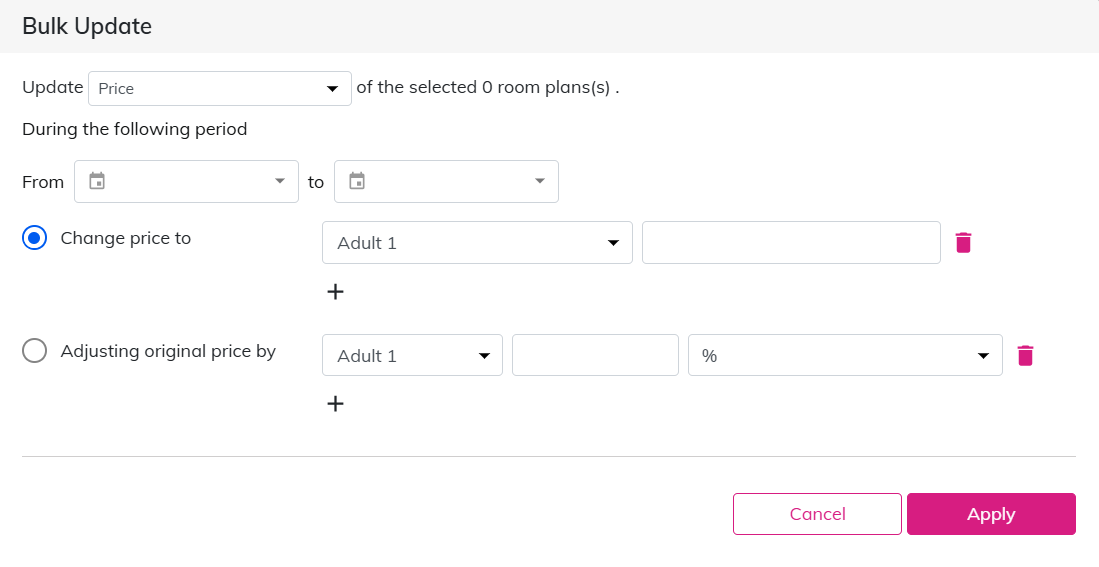 |
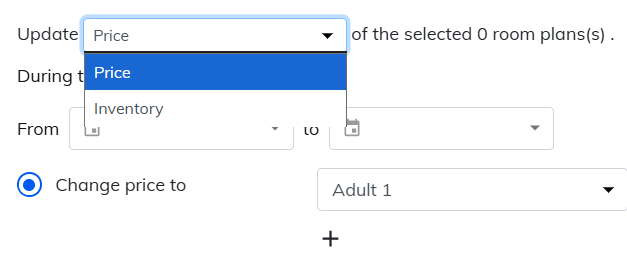
| Step 2 | Click dropdown and choose [Inventory] .
|
| Step 3 | Set the target "period" (year can be set up to 10 years ahead).
|
| Step 4 | When the target period is selected, the day-of-week options will appear.
Select the days of the week to apply. |
| Step 5 | Enter the number of rooms in the "Change Inventory to" field.
|
| Step 6 | Change the sales status to "Open" and click [Apply] to complete the bulk inventory update.
|
3.2 Bulk Update Price
| Step 1 | ・Check the "target room" type.
・Click [Bulk Update], pop-up window will display.
|
| Step 2 | Click dropdown and choose [Price] .
|
| Step 3 | Set the target "period" (year can be set up to 10 years ahead).
|
| Step 4 | When the target period is selected, the day-of-week options will appear.
Select the days of the week to apply. |
| Step 5 | Enter the appropriate rates for each setting. ・From Set Price, enter the rate for each condition. 
・From Adjust Base Price, set a price increase by percentage (%) or amount (¥) based on the original price.
*Click the "trash can icon" to delete the selected rate.
|
| Step 6 | Click [Apply] to complete the bulk price update. |
Related Articles
Extra Inventory Management
Purpose This section is to explain how to manage daily inventory of Extra, that has been set on the Extra section. ⏱ Estimated time: ~5 mins When an extra is reserved via Tripla Book, inventory is automatically updated. If inventory is 9 or fewer, ...
Extras: Inclusive Extra
Purpose: This section explains how to configure extras that are included in a plan by default, without requiring separate extra settings. ⏱Estimated time: ~10 minutes Note: This feature is not available when using tripla Link. Inclusive Extras are ...
Permissions Management
Purpose: This section explains how to manage the users or accounts that can access and operate the admin panel. These users are referred to as administrators, accounts, or concierges. ⏱ Estimated Time: ~10 Minutes. Account and Email Address Rules ...
Plan Management
Purpose: This section is to explain how to bulk editing for Plans. ⏱ Estimated time: ~5min 1. Where to Set Setting page: Brand Management screen Action: 'Setting' → 'Booking Engine' → [Plan Management] 2. How to Bulk Edit Plans Step 1 Select the ...
Extras: Optional Extra
Purpose: This section explains how to create Extras, such as special dishes or cakes, that can be attached to a plan. ⏱ Estimated time: ~10 mins Note: This feature is supported only for TL Lincoln, TEMAIRAZU, NEPPAN, and RAKUTSU. It is not displayed ...

