LINE Integration

Purpose:
This section explains how to integrate Chatbot with LINE, Creating Rich Menu, and integrating LINE with tripla connect.
⏱ Estimated time: ~30 mins

A LINE Login channel is required for LINE SSO settings, and a Messaging API channel is required for LINE Bot settings.
Both channels must be created under the same provider.
1. Integrating with LINE
1.1 Items required for integration:
- LINE Official Account (for LINE Business)
- Admin access is required for the LINE Official Account above.
*Member access cannot be used to get the Messaging API channel access token. - tripla Bot
1.2 Where to Set
- Setting page: Property Management Screen
- Action: 'Admin Setting' → [Features and Integrations]
Under "System Integration" enable LINE integration.The LINE integration setup screen will be displayed as shown below.
2. Integration Setup
2.1 How to Create a Messaging API Channel (Required)
- The Messaging API must be enabled in LINE Official Account Manager before registering the Channel Secret and Webhook URL.
Step 1 Step 2 On the top right side of the screen, click [Setting]. Step 3
Messaging API will be displayed, and click [Enable Messaging API].Step 4 Register developer info (Name and Email), and click [Agree]. Step 5 Create New "Provider".
Enter New Provider Name in the field, and click [Agree].Step 6 Enter necessary information and click [OK]. Step 7
2.2 Channel Secret (Required)
- Copy the "Channel Secret" code in the "Message API" screen.
- Paste it into "Channel Secret" field in the tripla management screen.
2.3 Webhook URL (Required)
- Copy the "Webhook URL" from the tripla management screen.
- Paste it into "Webhook URL" field on the LINE side, then click [Save].
2.4 Channel Access Token (Required)
Step 1 Step 2 Select [Provider]. Step 3 Step 4 ・Display will be redirected to Channel Basic Settings screen.
・Click [Messaging API].Step 5 Scroll down to the bottom of the page.
Under "Channel access token" click [Issue].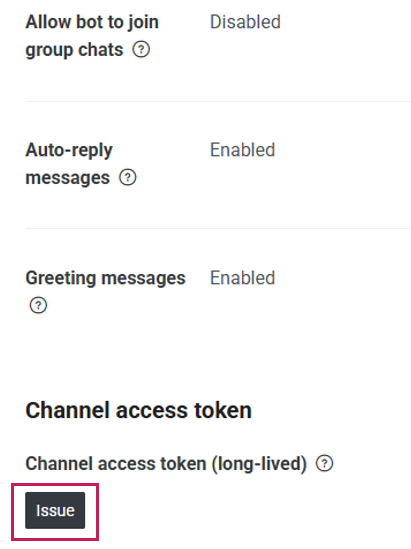
Step 6 Copied the issued "Channel access token" code.
Paste it into the "Channel Access Token" field in the "tripla management screen".2.5 Enable the Integration (Required)
Step 1 Turn ON the toggle Step 2 ・Checked the "Term of Use" and "Privacy Policy".
・Then click [Save].
3. Responding to Inquiries Using AI
When LINE has integrated with Bot, the users can who open the chatbot on their smartphones will be able to make inquiries via LINE.
No additional fees are incurred on the tripla Bot side when integrating tripla Bot with LINE.
With the free version of LINE Business, up to 200 messages can be sent.
To send more than this limit, a paid LINE Business plan is required.
3.1 Integration Method
Follow these three steps to integrate LINE with the bot.3.1.1 Enable "Allow users to chat directly via LINE mobile"
- On the tripla management screen, enable the [Allow users to chat directly via LINE mobile].
- This option is available under the "Term of Use and Privacy Policy".
- Check the box to enable users to chat directly with the bot on the LINE mobile app.
tripla Management Screen Chat Bot (User View) User View After selecting LINE
The Users will be redirected to LINE, and the inquiry will start when they click [Add].3.1.2 Configure Chat Settings in the LINE Official Account Manager
Step 1 Step 2 Step 3 3.1.3 Hide "FAQ"
If the chatbot’s "Auto message" type is set “FAQ,” they will also be displayed in the same way on LINE.To prevent this message from appearing, uncheck the LINE option in the automated message settings screen and click [Save].
4. Creating Rich Menu
After activating this integration, LINE Rich can be set up, by clicking on [LINE Rich Menu] on the light bulb box.
Or, Access LINE Rich Menu through
- Setting page: Property Management Screen
- Action: 'Menus' → "LINE Rich Menu"
Fill the information as per below description:
| 1. Component Name | Enter Component Name. *This will not be shown in the users screen. |
| 2. Menu bar label | Set the word on the menu bar. |
| 3. Lay Out | Set Lay Out Button. *There are 4 kind of Lay out Button. |
| 4. Menu | Choose menu for the lay out button. To add component click [+Add New Shared Component] |
| 5. Image | Upload image as Lay out button image. *The dimension should be 1200x800. *The file size should be less than 900KB. |
5. Sending Message from Tripla Connect to LINE
Requirements for Integration:
- LINE Official Account (LINE Yahoo for Business)
- Integration between tripla and LINE
- tripla Connect
*A contract for tripla Connect is required for SNS integration.
5.1 Set the delivery destination (segment)
- Setting page: tripla connect Management Screen
- Action: 'Segment V2' → [+New]
Step 1 Open the segment setting screen, and enter the segment name on the [Create Custom User Segment] field and condition on [Rule]. Step 2
"Messenger Channel" | "Include" | LINEThen click [Refresh] button on the right to display the number of users who meet the criteria and can be targeted for delivery, and click [Save].Step 3 5.2 Sending Message via tripla Connect
5.2.1 Where to Set
- Setting page: tripla connect Management Screen
- Action: 'Campaign' → [Create]
5.2.2 Set the Campaign
Open the New Campaign Screen and fill in the Campaign field base on the below description:
1. Campaign Name Enter the Campaign Name.
*This will not be displayed on the customer screen and for managing purpose only.2. Tags Add tag
*This will also not be displayed on the customer screen.
*This field can be left blank if not necessary.3. Customer Segment Choose customer segment that has been created previously on 'Segment V2' from the dropdown 4. Campaign Type Select "SNS Broadcast" from the dropdown. 5. Title Enter any desired title (this will not be visible to customers). 6. Channel Choose [LINE] as channel. 5.2.3 Set Message Content
1. Image To Add image, turn ON the toggle and Upload an image. 2. Text Enter text for the Broadcast. 3. Button ・Enable [Add CTA Button] to guide users to a specific link.
・enter the button title and destination URL.5.2.4 Sending test message to check the content
Step 1 ・double check the content, and click [Save].
・Then, click [Send Sample] button.
*[Send Sample] button will be available once the campaign content has been saved.Step 2 Scan the QR code displayed. Step 3 After scanning, the message will open with the content pre-filled code.
Click the send button to complete the sample delivery.Step 4 After the content pre-filled code sent, the campaign content will be displayed. 5.2.5 Sending Message
If the campaign content is correct, proceed with actual delivery by clicking [Send now] on the bottom of the page.Checked the [Schedule] option to specify deliver date and time, and click [Save].
5.2.6 Excluding Recipient
To prevent duplicate deliveries, enable [Exclude users who have received a marketing message in the last [ ] days] and set the desired time period.5.2.7 Repeats
Checked the [Repeats] option to to send messages automatically on a recurring basis.
1. Never The message will continue to be delivered repeatedly without ending unless an end condition is set. 2. On 3. After
▼Example:・After "10" instances・The message is sent 10 times, no further deliveries occur5.2.8 How to segment and send messages to already registered LINE friends
This setting is intended for uses who have been operating an official LINE account prior to signing a Connect contract.
If there are existing LINE friends registered before enabling LINE integration with tripla,a discrepancy may occur between the number of users shown in tripla Connect segments and the total number of LINE friends.To close this gap, segmentation must be performed using the steps below so that the accounts become eligible for message delivery.
Step 1 ・Send a LINE message from the LINE Official Account to generate user activity.
・The message should encourage an easy reply, since users must respond at least once.Step 2 When a user replies, their action history is recorded and they are added to Connect segments, making them eligible for LINE message delivery. Step 3
・After enabling LINE integration, and collecting user action history, the data is not reflected immediately but will appear the following day.・For example, if an users takes an action on March 1, 2025,
they will be included in the tripla Connect segment on March 2, 2025.Any action from the user—whether sending a message or even just a sticker—will register them in Connect and add them to the segment.5.2.9 Importing LINE Friends
Import LINE member (LINE Friends) all at once by going to:
- Setting page: tripla Bot Property Management Screen
- Action: 'Admin Setting' → "Features and Integrations"
Step 1 Step 2

・ A LINE Official Account Business plan or Premium / Verified access (with a Light or Standard plan purchase) is required.If the error message “This feature is only supported for LINE premium accounts” appears, the current LINE account is not eligible.・This import is a one-time migration. Continuous synchronization is not performed under the current specifications.It is intended to manage LINE friends who were added before enabling the tripla Book and LINE integration.
6. Check Delivery Results
- The results of the SNS distribution cannot be viewed in detail on the Tripla management screen.
- Please check the LINE Official Account Manager analytics screen for more detailed information.
Related Articles
Facebook Messenger Integration
Purpose This section is to explain how to set up Facebook Messenger Integration within the tripla management screen. ⏱Estimated time: ~10 Minutes Required Setting: 2. Facebook Messenger System integration (Required) 3. Enabling Facebook Messenger ...tripla Book – Google Hotel Ads Integration
Purpose: This section explains how to integrate Tripla Book with Google Hotel Ads, Google’s hotel search and advertising service. ⏱ Estimated time: ~10mins Requirements for Appearing in Google’s Free Booking Links: A Google Business Profile account ...How to Set Up SNS Account Login (SSO)
Purpose This section explains the flow for registering as a member using a guest’s SNS account. ⏱ Estimated time: ~10 min There are two integration methods. Enable Social Media SSO-Link from the tripla membership login screen to the SSO login screen ...Features and Integrations
Purpose: This section explains the services in Features and Integrations. Note: Changing the ON/OFF settings under “Features and Integrations” may affect related functions and the timing of service billing. Please be sure to contact your tripla sales ...Campaign
Purpose: This section is to explain how to create the content of marketing Emails. Required Setting: 2. Campaign Basic Settings (Required) 3. Campaign Type (Required) 7. Save, Send Email, and Delete (Required) *All of the above settings must be ...